How to write a to-do dizmo with backbone.js
In the first part of our tutorial series we built a basic to-do dizmo, using the dizmoElements library. Now, as promised, we will build a to-do dizmo using the Backbone.js library.
The Backbone.js project is useful for keeping the JavaScript Code of your dizmos well organized, so it’s easier to further develop and maintain. You can work with the Model-View-Controller pattern MVC and create, read, update and delete your (CRUD) data. Backbone.js is also well-suited to create single-page applications, which dizmos are.
We will still be using dizmoElements for styling. To avoid confusion with the to-do dizmo from the first stage of our tutorial series, we will name this dizmo "Todobb". When applicable, we will follow the steps made in the first part.
Getting started
Start by creating a new dizmo project by:
$ grace newName your project “Todobb” and use the following parameters when asked by grace:
Name: Todobb
type: dizmo
skeleton: joose
Adding Backbone.js
First, we are adding the Backbone.js library and its dependencies. Copy the following libraries to the specified folders:
- underscore-min.js to the folder ‘src/lib/underscore/’
- backbone-min.js to the folder ‘src/lib/backbone/’
- backbone-dizmo.js to the folder ‘src/lib/backbone-dizmo’
Note: the backbone-dizmo library is provided by dizmo and implements the backbone to the dizmo privateStorage adapter.
Edit the file ‘src/index.html’ to contain the following lines in the head section.
<!-- Backbone.js libraries -->
<script type="text/javascript" src="lib/underscore/underscore-min.js"></script>
<script type="text/javascript" src="lib/backbone/backbone-min.js"></script>
<script type="text/javascript" src="lib/backbone-dizmo/backbone-dizmo.js"></script>
<!-- End of Backbone libraries -->
Note: Preserve the order in which the libraries are loaded.
Backbone.Model
Backbone models contain data for an application as well as the logic around this data. For this tutorial, we use a model to represent the concept of a to-do item including its attributes like title (to-do content) and completed (current state of the to-do). Create the file model.js and save it to the folder ‘src/javascript/’.
var app = {}; // create namespace for our app

//Define a Todo model
app.Todo = Backbone.Model.extend({

    //Default attributes for the todo item.
    defaults: function() {
        return {
            title: "",
            completed: false
        };
    }
});
To include model.js in our project, add //= require model to the beginning of main.js:
//= require modelYou can test what you just coded in dizmoViewer. Run the following command in your terminal/command line:
$ python manage.py zipNext, drag and drop the resulting .dzm file, that you find in the build folder, into the dizmoViewer.
Set dizmoViewer into ‘Development Mode’ and open the Web Inspector of the to-do dizmo. Try out the following code in the console tab:
var todo = new app.Todo({title: 'Create a task manager', completed: false}); // create object with the attributes specified.
todo.get('title'); // "Create a task manager"
todo.get('completed'); // false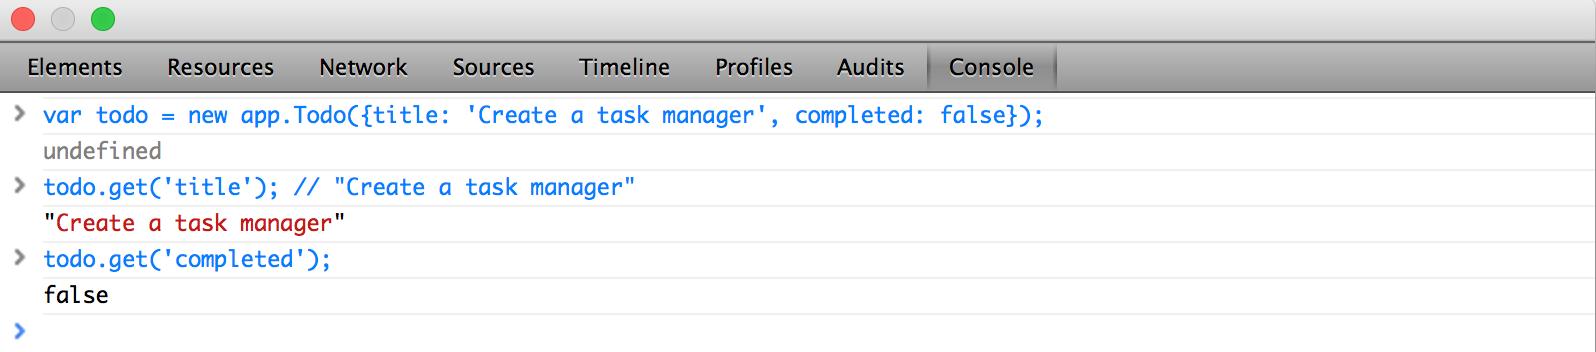
Inspector_Todobb
Backbone.Collection
Collections are sets of models which data to be saved. We will store data in the dizmo date tree by using backbone-dizmo.js which we have included with the other libraries in index.html. Create the file collection.js and save it to the folder ‘src/javascript/’.
// Todo Collection
// The collection of todos are stored in the dizmo data tree

app.TodoList = Backbone.Collection.extend({
    model: app.Todo,
    localStorage: new Store("backbone-todo")
});

// instance of the Collection
app.todoList = new app.TodoList();
Then we include collection.js in main.js.
//= require collectionTry out the following in the Web Inspector:
var todoList = new app.TodoList()
todoList.create({title: 'Learn about Backbone.Collection'});
var model1 = new app.Todo({title: 'Learn models', completed: true});
todoList.add(model1);
todoList.pluck('title');     // ["Learn Backbone.Collection", "Learn models"]
todoList.pluck('completed'); // [false, true]
JSON.stringify(todoList);    // "[{"title":"Learn about Backbone.Collection","completed":false,"id":"f305299e-1d18-e5df-dffe-bdc7a87c8e7f"},{"title":"Learn models","completed":true}]"
Backbone.View
Backbone views are used to reflect what the data models look like. Views listen to changes on the model.
There are four basic properties in a backbone view: el, initialize, render, and events.
The ‘el’ property references the DOM element created in the browser.
To initialize the property, you have the option to pass parameters that will be attached to a model, collection or view.el.
The ‘render()’ function injects the markup into the elements.
Lastly, the view listens to events and reacts accordingly.
Todo view
The todo view renders each of the todo model objects into the page. In your todo project folder, edit the file src/index.html. In the file index.html, replace everything between <div class="center"> and </div> with:
<div id="task-entry">
    <input id="new-todo" data-type="dizmo-input" placeholder="Add a new task"  required>
</div>
<div id="main"
    <div class="list dizmo-no-drag" data-type="dizmo-list"><ul id="todo-list"></ul></div>
</div>
And add the item-template:
<!-- Templates -->
<script type="text/template" id="item-template">

        <input class="toggle" data-type="dizmo-checkbox" type="checkbox">
        <label class="tasklabel"><%- title %></label>

</script>
We have an inputfield and a list styled with dizmoElements, as well as a template item-template will render each todo item with the class todo view. The item-template uses the place-holder <%- %> to dynamically insert data. Create the file view.js, and save it to the folder ‘src/javascript/’ and include into main.js.
// Renders individual todo items list (li)
app.TodoView = Backbone.View.extend({
    tagName: 'li',
    template: _.template($('#item-template').html()),
    render: function(){
        this.$el.html(this.template(this.model.toJSON()));
        setTimeout(function(){
            // initialize dizmo elements
            DizmoElements(".toggle").dcheckbox();
        },50);
        return this; // enable chained calls
    }
});
The Backbone.View uses the template (#item-template) to fill it out with the title from the model that we pass. New render elements will be wrapped with <li></li> with tagName: 'li'. The dizmoElements checkbox is initialized in the render function.
As we only have the front, we remove in the initEvents function of src/javascript/main.js the existing handler for the ‘Done’ button on the back and in src/application.js, remove the function:
// If your dizmo has a back side and you want to access it include this function,
// otherwise you can delete it!
function showBack() {
    dizmo.showBack();
}
App view
The app view will handle the creation of new todos and rendering of the initial todo list. The app view contains Backbone events, so that an object has the ability to bind and trigger custom named events. Add the following code to view.js.
app.AppView = Backbone.View.extend({
    el: '#front',
    initialize: function () {
        this.input = this.$('#new-todo');
        // when new elements are added to the collection render then with addOne
        app.todoList.on('add', this.addOne, this);
        app.todoList.on('reset', this.addAll, this);
        app.todoList.fetch(); // Loads list from local storage
    },
    events: {
        'keypress #new-todo': 'createTodoOnEnter'
    },
    createTodoOnEnter: function(e){
        if ( e.which !== 13 || !this.input.val().trim() ) { // ENTER_KEY = 13
            return;
        }
        app.todoList.create(this.newAttributes());
        this.input.val(''); // clean input box
    },
    addOne: function(todo){
        var view = new app.TodoView({model: todo});
        $('#todo-list').append(view.render().el);
    },
    addAll: function(){
        this.$('#todo-list').html(''); // clean the todo list
        app.todoList.each(this.addOne, this);
    },
    newAttributes: function(){
        return {
            title: this.input.val().trim(),
            completed: false
        };
    }
});
Now, add the initializer to src/application.js
app.appView = new app.AppView();We can now create new todo items in the UI and display them.
Adding an update, checking off and deleting todos
Let’s add a delete button first, to remove a todo item. In src/index.html add in the item-template:
<button data-type="dizmo-button" class="destroy">x</button>The dizmoElements button also needs to be initialized in the render function of the todo view, add:
setTimeout(function(){
    // initialize dizmo elements
    DizmoElements(".toggle").dcheckbox();
    DizmoElements(".destroy").dbutton();
},50);
As the todo view renders each of the todo model objects, add:
initialize: function(){
    this.model.on('destroy', this.remove, this);
},

events: {
        'click .destroy': 'destroy'
    },

destroy: function(){
    this.model.destroy();
}
Now we look at how to handle clicks on the checkbox, which should then update the completed attribute of the item. In src/index.html change the checkbox template in the item-template to:
<input class="toggle" data-type="dizmo-checkbox" type="checkbox" <%= completed ? 'checked' : '' %>>We tell our model to save the change.
toggle: function(){
    this.save({ completed: !this.get('completed')});
}
And in the todo view, add:
events: {
    'click .toggle': 'toggleCompleted',
    'click .destroy': 'destroy'
},

toggleCompleted: function(){
    this.model.toggle();
},
For editing existing todo items, in src/index.html we add in the item-template:
<input data-type="dizmo-input" class="edit" value="<%- title %>">We initialize the dizmoElements inputfield in the render function of the todo view:
setTimeout(function(){
    // initialize dizmo elements
    DizmoElements(".toggle").dcheckbox();
    DizmoElements(".edit").dinput();
    DizmoElements(".destroy").dbutton();
},50);
And add:
initialize: function(){
        this.model.on('change', this.render, this);
        this.model.on('destroy', this.remove, this);
    },
    events: {
        'click label' : 'edit',
        'keypress .edit' : 'updateOnEnter',
        'blur .edit' : 'close',
        'click .toggle': 'toggleCompleted',
        'click .destroy': 'destroy'
    },
    edit: function(){
        this.$el.addClass('editing');
        this.input.focus();
    },
    close: function() {
        var value = this.input.val().trim();
        if (!value) {
            this.clear();
        } else {
            this.model.save({title: value});
            this.$el.removeClass("editing");
        }
    },
    updateOnEnter: function(e){
        if(e.which == 13){
            this.close();
        }
    }
To hide the edit inputfield we also add in style.scss:
#front #todo-list input.edit {
  display: none; }
#front #todo-list .editing label {
  display: none; }
#front #todo-list .editing input.edit {
  display: inline; }
We can now add, remove and update todo items. Let’s add two buttons to clear all todo items and to clear all completed items. In index.html we add:
<div id="actions">
    <button id="clear-all" data-type="dizmo-button">Clear all</button>
    <button id="clear-completed" data-type="dizmo-button">Clear completed</button>
</div>
In your app.Appview, extend your events to take care of these click-events:
events: {
    'keypress #new-todo': 'createTodoOnEnter',
    'click #clear-completed': 'clearCompleted',
    'click #clear-all': 'clearAll'
},
and add the functions:
clearCompleted: function() {
        _.invoke(app.todoList.completed(), 'destroy');
        return false;
    },

clearAll: function() {
    _.invoke(app.todoList.toArray(), 'destroy');
    return false;
}
Your to-do dizmo is functional but still unstyled.
Styling and usability
To change the framecolor to white in dizmo.js, add the following right at the end of the setAttribute() function:
// Set framecolor to white
dizmo.setAttribute('settings/framecolor', '#ffffffDB');
Also, a checked todo item should be crossed out. We add a conditional class to the label in item-template:
<label class="tasklabel <%= completed ? 'done' : ''%>"><%- title %></label>and add that class to our style.scss:
.done {
  text-decoration: line-through;
}
We also want to add a scrollbar when the list grows. We edit index.html:
<div class="list dizmo-no-drag" data-type="dizmo-list" id="listdiv"><ul id="todo-list"></ul></div>And create the scrollbar in the initialize function of app.Appview:
DizmoElements('#listdiv').dlist('update');
// create scrollbar
if (this.iscroll !== undefined) {
    this.iscroll.dlist('create');
} else {
    this.iscroll = DizmoElements('#listdiv');
    this.iscroll.dlist();
}
Then, when we add a new todo item with the function addOne as well as when a todo item is deleted (with the function destroy) we update the list:
DizmoElements('#listdiv').dlist('update');Also edit the src/style/style.scss to add the necessary styling classes and finally replace the default icon of the dizmo.
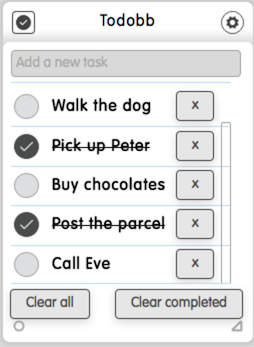
Todobb dizmo
Get the source code
You can find the source code on Github.
git clone https://github.com/dizmo/TodoBackbone.git