Beat the heat with dizmo – A solar panel arduino project
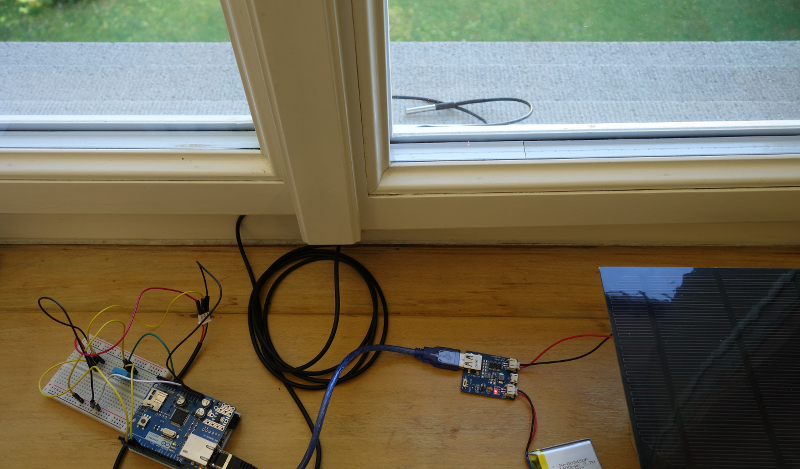
The last few days have been very hot, and it’s almost impossible to have your room cool enough to sleep or work! Here at dizmo, we have an interesting solution for that… a solar panel control for windows, powered by arduino and dizmo.
Parts needed:
- Arduino Ethernet or Arduino Uno + Ethernet Shield
- DHT11 or DHT22 Temperature/Humidity Sensor
- DS18B20 Temperature Sensor
- Breadboard
- 2 10k resistors
- Jumper cables
optional:
- 3W solar panel
- LiPo Rider Pro solar charger
- 1400mAh LiPo battery (or larger)
Electrical hookup:
The DHT11/DHT22 sensor has 4 legs. Connect the first one (from the left) to 5V on the Arduino. The second pin goes to Pin 6 and the fourth pin to GND. The third pin is not connected. Also insert a 10k pull-up resistor between the first and second pin of the sensor.
The DS18B20 sensor has 3 wires. Connect the first one (from the left) to the 5V pin of the Arduino. The second goes to Pin 5 of the Arduino and the third to GND. Again, insert a 10k pull-up resistor between the first and second wire.
The LiPo Rider Pro has two connectors, one for the battery and another one for the solar panel. The Arduino connects to the USB-Output port of the LiPo Rider.
Arduino library installation
Install the libraries by following this guide:
https://learn.sparkfun.com/tutorials/installing-an-arduino-library
Arduino code:
#include <OneWire.h>
#include "DHT.h"

#include <SPI.h>
#include <Ethernet.h>

// Local Network Settings
byte mac[] = { 0x90, 0xA2, 0xDA, 0x00, 0x91, 0x8C }; // Must be unique on local network

#define DHTPIN 6     // what pin we're connected to

// Uncomment whatever type you're using!
#define DHTTYPE DHT11   // DHT 11
//#define DHTTYPE DHT22   // DHT 22  (AM2302)
//#define DHTTYPE DHT21   // DHT 21 (AM2301)

DHT dht(DHTPIN, DHTTYPE);

// OneWire DS18S20, DS18B20, DS1822 Temperature Example
//
// http://www.pjrc.com/teensy/td_libs_OneWire.html
//
// The DallasTemperature library can do all this work for you!
// http://milesburton.com/Dallas_Temperature_Control_Library

OneWire  ds(5);  // on pin 10 (a 4.7K resistor is necessary)

// thingspeak server
byte server[]  = { 184, 106, 153, 149 }; // ThingSpeak IP Address: 184.106.153.149
// ThingSpeak Settings
char thingSpeakAddress[] = "api.thingspeak.com";
String writeAPIKey = "XXXXXXXXXXXXXXXX"; // replace with your thingspeak API Key
const int updateThingSpeakInterval = 30 * 1000;      // Time interval in milliseconds to update ThingSpeak (number of seconds * 1000 = interval)

// Variable Setup
long lastConnectionTime = 0;
boolean lastConnected = false;
int failedCounter = 0;

// Initialize Arduino Ethernet Client
EthernetClient client;

void setup(void) {
  Serial.begin(9600);

  // Start Ethernet on Arduino
  startEthernet();

  dht.begin();
}

void loop(void) {

  delay(30000);

    // Reading temperature or humidity takes about 250 milliseconds!
  // Sensor readings may also be up to 2 seconds 'old' (its a very slow sensor)
  float h = dht.readHumidity();
  // Read temperature as Celsius (the default)
  float t = dht.readTemperature();
  // Read temperature as Fahrenheit (isFahrenheit = true)
  float f = dht.readTemperature(true);

  // Check if any reads failed and exit early (to try again).
  if (isnan(h) || isnan(t) || isnan(f)) {
    Serial.println("Failed to read from DHT sensor!");
    return;
  }

  // Compute heat index in Fahrenheit (the default)
  float hif = dht.computeHeatIndex(f, h);
  // Compute heat index in Celsius (isFahreheit = false)
  float hic = dht.computeHeatIndex(t, h, false);

  Serial.print("Humidity: ");
  Serial.print(h);
  Serial.print(" %\t");
  Serial.print("Temperature: ");
  Serial.print(t);
  Serial.print(" *C ");
  Serial.print(f);
  Serial.print(" *F\t");
  Serial.print("Heat index: ");
  Serial.print(hic);
  Serial.print(" *C ");
  Serial.print(hif);
  Serial.println(" *F");

  // ****

  byte i;
  byte present = 0;
  byte type_s;
  byte data[12];
  byte addr[8];
  float celsius, fahrenheit;

  if ( !ds.search(addr)) {
    Serial.println("No more addresses.");
    Serial.println();
    ds.reset_search();
    delay(250);
    return;
  }

  Serial.print("ROM =");
  for( i = 0; i < 8; i++) {
    Serial.write(' ');
    Serial.print(addr[i], HEX);
  }

  if (OneWire::crc8(addr, 7) != addr[7]) {
      Serial.println("CRC is not valid!");
      return;
  }
  Serial.println();

  // the first ROM byte indicates which chip
  switch (addr[0]) {
    case 0x10:
      Serial.println("  Chip = DS18S20");  // or old DS1820
      type_s = 1;
      break;
    case 0x28:
      Serial.println("  Chip = DS18B20");
      type_s = 0;
      break;
    case 0x22:
      Serial.println("  Chip = DS1822");
      type_s = 0;
      break;
    default:
      Serial.println("Device is not a DS18x20 family device.");
      return;
  }

  ds.reset();
  ds.select(addr);
  ds.write(0x44, 1);        // start conversion, with parasite power on at the end

  delay(1000);     // maybe 750ms is enough, maybe not
  // we might do a ds.depower() here, but the reset will take care of it.

  present = ds.reset();
  ds.select(addr);
  ds.write(0xBE);         // Read Scratchpad

  Serial.print("  Data = ");
  Serial.print(present, HEX);
  Serial.print(" ");
  for ( i = 0; i < 9; i++) {           // we need 9 bytes
    data[i] = ds.read();
    Serial.print(data[i], HEX);
    Serial.print(" ");
  }
  Serial.print(" CRC=");
  Serial.print(OneWire::crc8(data, 8), HEX);
  Serial.println();

  // Convert the data to actual temperature
  // because the result is a 16 bit signed integer, it should
  // be stored to an "int16_t" type, which is always 16 bits
  // even when compiled on a 32 bit processor.
  int16_t raw = (data[1] << 8) | data[0];
  if (type_s) {
    raw = raw << 3; // 9 bit resolution default
    if (data[7] == 0x10) {
      // "count remain" gives full 12 bit resolution
      raw = (raw & 0xFFF0) + 12 - data[6];
    }
  } else {
    byte cfg = (data[4] & 0x60);
    // at lower res, the low bits are undefined, so let's zero them
    if (cfg == 0x00) raw = raw & ~7;  // 9 bit resolution, 93.75 ms
    else if (cfg == 0x20) raw = raw & ~3; // 10 bit res, 187.5 ms
    else if (cfg == 0x40) raw = raw & ~1; // 11 bit res, 375 ms
    //// default is 12 bit resolution, 750 ms conversion time
  }
  celsius = (float)raw / 16.0;
  fahrenheit = celsius * 1.8 + 32.0;
  Serial.print("  Temperature = ");
  Serial.print(celsius);
  Serial.print(" Celsius, ");
  Serial.print(fahrenheit);
  Serial.println(" Fahrenheit");

  // ****

  // Print Update Response to Serial Monitor
  if (client.available())
  {
    char c = client.read();
    Serial.print(c);
  }

   // Disconnect from ThingSpeak
  if (client.connected() && lastConnected)
  {
    Serial.println("...disconnected");
    Serial.println();

    client.stop();
  }

  Serial.println("state:"+String(client.connected(),DEC));
  Serial.println("last connection time:"+String(lastConnectionTime,DEC));
  Serial.println("diff:"+String((millis() - lastConnectionTime),DEC));

  // Update ThingSpeak
  if(!client.connected() && (millis() - lastConnectionTime > updateThingSpeakInterval))

    updateThingSpeak("field1="+String(t, DEC)+"&field2="+String(h, DEC)+"&field3="+String(celsius, DEC));

  // Check if Arduino Ethernet needs to be restarted
  if (failedCounter > 3 ) {startEthernet();}

  lastConnected = client.connected();
}

void updateThingSpeak(String tsData)
{
  if (client.connect(thingSpeakAddress, 80))
  {
    client.print("POST /update HTTP/1.1\n");
    client.print("Host: api.thingspeak.com\n");
    client.print("Connection: close\n");
    client.print("X-THINGSPEAKAPIKEY: "+writeAPIKey+"\n");
    client.print("Content-Type: application/x-www-form-urlencoded\n");
    client.print("Content-Length: ");
    client.print(tsData.length());
    client.print("\n\n");

    client.print(tsData);

    lastConnectionTime = millis();

    if (client.connected())
    {
      Serial.println("Connecting to ThingSpeak...");
      Serial.println();

      failedCounter = 0;
    }
    else
    {
      failedCounter++;

      Serial.println("Connection to ThingSpeak failed ("+String(failedCounter, DEC)+")");
      Serial.println();
    }

  }
  else
  {
    failedCounter++;

    Serial.println("Connection to ThingSpeak Failed ("+String(failedCounter, DEC)+")");
    Serial.println();

    lastConnectionTime = millis();
  }
}

void startEthernet()
{

  client.stop();

  Serial.println("Connecting Arduino to network...");
  Serial.println();

  delay(1000);

  // Connect to network and obtain an IP address using DHCP
  if (Ethernet.begin(mac) == 0)
  {
    Serial.println("DHCP Failed, reset Arduino to try again");
    Serial.println();
  }
  else
  {
    Serial.println("Arduino connected to network using DHCP");
    Serial.println();
  }

  delay(1000);
}
We’re going to use thingspeak.com to post and store the data. Sign up for an account there and note the API key given. Make sure that you replace the API Key in the Arduino sketch above!
Transfer the sketch to your Arduino and open the serial console. You should see the reported temperature values for both sensors and that they are posted to thingspeak.com
In the thingspeak.com Dashboard you should see the current sensor values being posted every 30 seconds.
Dizmo:
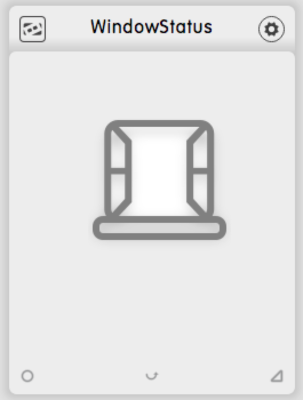
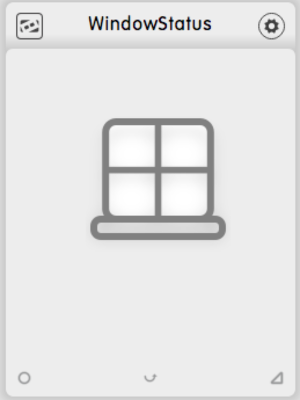
Let’s create a dizmo that visualizes the desired window state … If it’s colder outside, the status should be ‘window open’ and if the temperature outside climbs above the inside temperature, the window should be ‘closed’.
grace newUse the following parameters when asked by grace:
Name: WindowStatus
type: dizmo
skeleton: joose
Go ahead and edit src/index.html to add an HTML image element:
   <div id="front">
        <div class="center">
            <img id="img" src="assets/window_closed.png">
        </div>
    </div>
Also edit src/javascript/main.js, to add a function that calls the thingspeak.com API regularly. Make sure you replace the channel id below with yours.
initEvents: function() {
            var self = this;

            jQuery('.done-btn').on('click', function() {
                WindowStatus.Dizmo.showFront();
            });

            var handler=function() {
               jQuery.getJSON('http://api.thingspeak.com/channels/<your channel id>/feed/last.json?callback=?', function(data) {
                    //console.log(data);
                    if (data.field3<data.field1) {
                        //console.log("open");
                        document.getElementById('img').src="assets/window_open.png";
                    } else {
                        //console.log("close");
                        document.getElementById('img').src="assets/window_closed.png";
                    }
               });
            };

            setInterval(handler, 30000);

        }
    }
Build and zip the dizmo with Grace.
python manage.py zipDrag the resulting file from the build folder into dizmoViewer.
Now, you know when to open and close your window! Stay cool!
We’re eager to see with what you come up to extend this solar panel dizmo and arduino project. Tweet us your ideas and implementations, using the hashtag #dizmonks!