How to create a to-do dizmo
To kick off this multi-part series, we will build a basic to-do dizmo, using the dizmoElements library and later Backbone.js.
Getting started
Start by creating a new dizmo project for your todo list with
$ grace newName your project ‘Todo’, choose ‘dizmo’ as your default plugin and ‘joose’ as your skeleton.
Change into the folder of your Todo dizmo.
$ cd TodoNote: If Node.js is installed, Grace provides linting by default. If you do not wish linting, uncomment the line //"autolint": false, in the file project.cfg.
To read more about our Grace tool, refer to the chapter Grace in our complete guide.
Inputfield with dizmoElements
In your Todo project folder, edit the file src/index.html. Remove existing content in between <div id="front"> and </div>. As we are only going to have a front side, also remove everything from <div id="back"> to </div>. This leaves us <div id="front"></div>.
First, we add an inputfield to the front side of our dizmo:
<div id="front">
<div id="task-entry">
    <input id="new-todo" data-type="dizmo-input" type="text" placeholder="Add a new task">
</div>
</div>
The handling of this inputfield is taken care by Main.js. When running the command grace new Grace generates a dizmo skeleton, among it the file Dizmo.js, which encapsulates dizmo specific functions and Main.js, which contains the Main class of your project. Go ahead and edit src/javascript/Main.js. In the initEvents function, remove the existing handler for the ‘Done’ button on the back that is no longer needed:
jQuery('.done-btn').on('click', function() {
               Todo.Dizmo.showFront();
});
Instead add a handler for each keypress in our inputfield:
// keypress handler for new task input field
jQuery('#new-todo').on('keypress', function(e) {
    self.updateOnEnter(e);
});
Next, implement the keypress handler function updateOnEnter:
updateOnEnter: function(e) {
    if(e.which == 13){
        this.addTodo();
    }
},
and the addTodo function as well, which is called when the key pressed is Enter (code 13):
addTodo: function() {
    var value=jQuery('#new-todo').val().trim();
}
The addTodo function grabs the current value of the input field. Of course we want to persist it, otherwise our Todo won’t be of much use!
Persisting data
Since we want separation of concern, we’re going to implement all persistent storage functionality in its own class. Create the file Storage.js in src/javascript
To include the new class in our project, add //= require Storage to the beginning of Main.js:
//= require Dizmo
//= require Storage
}
This statement includes Storage.js into Main.js when building the project with grace.
Now, start to implement the storage class in Storage.js:
Class("todo.Storage", {
    my: {
        has: {
            storagelist: {
                is: 'rw',
                init: [],
                setterName: 'setStorageList',
                getterName: 'getStorageList'
            }
        },
        methods: {
...
Description of the statements in the code above:
- my: defines static methods in our class
- has: describes the properties of this class … what we need is an array of todo items, hence we call it storagelist
- is: ‘rw’ defined that this property is readable and writeable
- init: defines the initial state, which is an empty array
Joose creates getters and setters for each property, which means you could set a new array with setstoragelist(); and get the value with getstoragelist(). Since we want “proper” camel-case function names, we can define the function names we want via setter- and getterName.
Let’s add our class methods, first the init function, which is empty for now:
init: function() {
},
Followed by the add function:
add: function(value) {
    var model= {};
    model.name=value;
    model.completed=false;
},
Borrowing from other storage library concepts, we first define a model that defines each todo item. Each has a name and a property ‘completed’, which is false by default. We also need an unique id for each item, to later access it. We thus need an ID generator. Add the following two functions:
_s4: function() {
    return (((1+Math.random())*0x10000)|0).toString(16).substring(1);
},

_generateid: function() {
    return (this._s4()+this._s4()+"-"+this._s4()+this._s4());
},
Since those are internal methods to our class, we mark them with an underscore first (this is an optional convention, follow it at your own discretion).
add: function(value) {
    var model= {};
    model.name=value;
    model.completed=false;
    model.id=this._generateid();
    this.storagelist.push(model);
    dizmo.publicStorage.setProperty("dizmo-todos",this.storagelist);
},
Now we can add the id property to the todo item, and push the object to our storagelist array. Next, we finally add the first dizmo specific call: As we want to save the array to the public storage of our dizmo, under the name dizmo-todos. We can simply pass our array to the setProperty function, since the implementation takes care to properly encode it for storage.
Now that we know how we store the todo items, we can also add the necessary code to load it back into the storagelist array at the initialization of the class:
init: function() {
    var records=dizmo.publicStorage.getProperty("dizmo-todos");
    if (records) { this.storagelist=records; }
},
The data is read from public storage and converted back into an array automatically, and then assigned to our property storagelist.
Back in Main.js we can now finalize the addTodo function in Main.js by adding these two lines:
todo.Storage.add(value);
jQuery('#new-todo').val('');
This adds the new todo item to the storage and clears the input field.
We also need to initialize the new class in Main.js. In the existing function initalize, add a call to the init method of the storage class:
after: {
    initialize: function() {
        todo.Storage.init();
...
At this point, we can create and add todo items via the inputfield to our Todo dizmo.
Build and zip the dizmo with the following command and drag the resulting file that you find in the build folder into dizmoViewer.
$ python manage.py zipNote: To prevent lint warnings, you’ll need to add "todo": true to the lint options in project.cfg (which is in the root folder of your project directory).
    "lintoptions": {
        "predef": {
            "Todo": true,
            "todo": true
        }
    },
The list
To display the todo items that we have created, we’re going to use a list element from the dizmoElement library, which will take care of a lot of the nitty-gritty details like scrolling and such.
First, add the list element to index.html, after our inputfield code:
<div id="todo-list" data-type="dizmo-list"></div>
Again, we’re going to abstract the list into it’s own class for the sake of separation of concern.
Create src/javascript/List.js and include it at the beginning of src/javascript/Storage.js with //= require List.
Our class has only one function, which is to show/refresh the list:
Class("todo.List", {
    my: {
        methods: {
            refresh: function() {

            var list=todo.Storage.getStorageList();

            var el = jQuery('<ul />');
            var list_el,i;
...
First, we get the current array of todo elements from the Storage class, using the getter defined there.
The actual HTML code of the list consists of an unordered list, the variable el contains the root element of the list.
Now we loop through the list of todo items and create a new <li> element. Inside each list element, we place a checkbox, representing the todo state, and a label containing the text of the todo.
for (i = 0; i < list.length; i++) {
    list_el=jQuery('<li />');

    jQuery('<input />',{
        'id':'cb'+i,
        'data-type': 'dizmo-input',
        'type':'checkbox'
    }).appendTo(list_el);

    jQuery('<label>',{
        'id':'la'+i,
        'text':list[i].name,
        'class': 'tasklabel'
    }).appendTo(list_el);

    list_el.appendTo(el);

}
Finally, the newly created todo list element is added to the el element.
Now, some housekeeping for the list. First, we destroy the existing scrollbar. The list uses the iScroll library internally.
// destroy scrollbar
if (this.iscroll !== undefined) {
    this.iscroll.dlist('destroy');
}
Then, we empty the list element and add the newly created elements.
// empty and re-fill list
jQuery('#todo-list').empty();
el.appendTo('#todo-list');
Now that the list is refilled, we can recreate the scrollbar
// create scrollbar
if (this.iscroll !== undefined) {
    this.iscroll.dlist('create');
} else {
    this.iscroll = DizmoElements('#todo-list');
    this.iscroll.dlist();
}
At last, we call the dizmoElements library, to tell that we have updated the list content with DizmoElements('#todo-list').dlist('update');
Only dizmoElements that are defined at the start of the dizmo are initialized by default. That’s why we now have to loop through the list of todo items again and initialize each element inside, in our case the checkbox. To address each element, we have given them an unique id, that represents their position inside the list.
For every checkbox that represents a completed todo item, we also check the corresponding checkbox:
for (i = 0; i < list.length; i++) {
    DizmoElements('#cb'+i).dcheckbox();
    if (list[i].completed) {
        DizmoElements('#cb'+i).prop('checked',true);
    }
}
This concludes building the implementation of the todo list. We also need to call the new class in Main.js, in the existing function initalize, add a call to the refresh method of the list class:
after: {
    initialize: function() {
        todo.storage.init();
        todo.list.refresh(); //<--
...
The only question now is when do we refresh the list? For this, we turn to another dizmo specific feature, subscriptions. Subscriptions are called as soon as something in the storage tree changes its value. This fits into our decoupled model of components very well. The list should only depend on the storage and refresh as soon as something in it changes. A newly added todo item should only be persisted in the storage and not have to care about refreshing the list.
To add a subscription, simply add the following function to the initEvents function in Main.js:
this.subId=dizmo.publicStorage.subscribeToProperty("dizmo-todos",function(path,value,oldValue){
    todo.List.refresh();
});
This subscribes to the dizmo-todos property, where we store our todo items. As soon as something changes, the refresh function of the List class is called. It’s really that easy with subscriptions!
Since the dizmo is already installed, we can simply use the grace deploy command to update the installed dizmo with our latest changes.
$ python manage.py deployNote: Read more about deploy, autodeploy and how to optimize your development cycle in the related chapter in the Grace documentation.
Adding update, checking off and deleting todos
Continue building the todo list. At the moment, we can add and display todos. Wouldn’t it be nice to check them off, delete them and even update them?
Let’s add a delete button first, to remove a todo item. For that, we extend the refresh function in List.js
jQuery('<button>',{
    'id' : 'bu'+i,
    'text': 'x',
    'data-type' : 'dizmo-button',
    'class': 'delete-todo'
}).appendTo(list_el);
These buttons also need to be initialized like the other dizmoElements inside the list:
// initialize elements inside list
for (var i = 0; i < list.length; i++) {
    DizmoElements('#cb'+i).dcheckbox();
    DizmoElements('#bu'+i).dbutton(); //<--
...
Back in Main.js, we need to figure out a way how to handle a button press and pass that on to the Storage class to remove a todo item from the list. Extend the initEvents function:
jQuery('#todo-list').on('click', function(e) {
    var tid,l,i,ioe;
    // get target id
    var otid=e.target.id;
    if (otid) { tid=otid.substr(0,2); }
...
Add a click listener to the list element. To figure out which actual element was clicked, we can refer to the `e.target.id` property of the event handler, which contains the id of the clicked element. We strip any number from the id and store it in the variable `tid`.
Now, we can handle any click to a button inside the list by checking if `tid` equals `bu` (one of the delete buttons). But how do we know which storage element to delete, you might ask? For that, we use the HTML5 data attribute and add the actual storage-id of the item to it, on each button element. Thus, each button refers directly to the storage item!
Edit the file List.js
jQuery('<button>',{
    'id' : 'bu'+i,
    'text': 'x',
    'data-id': list[i].id, //<--
    'class': 'delete-todo',
    'data-type' : 'dizmo-button'
}).appendTo(list_el);
In Main.js (in the click handler) we can now get the data-attribute data-id and pass it to a function in our storage class:
// get data-id attribute of target
var eid=e.target.getAttribute('data-id');

if (eid) {
// button
    if (tid=="bu") {
        todo.Storage.deleteOne(eid);
    }
...
Our Storage class also needs to delete the todo item, add the deleteOne function:
deleteOne: function(id) {
    for (var i = 0; i < this.storagelist.length; i++) {
        if (id==this.storagelist[i].id) {
            var removed=this.storagelist.splice(i,1);
        }
    }
dizmo.publicStorage.setProperty("dizmo-todos",this.storagelist);
},
Simply loop through all the items and remove the item with the matching id from the array. Do not forget to store the current array back to publicStorage. The subscription will then trigger a list refresh automatically and the todo item is removed!
Next up is how to handle clicks on the checkbox, which should then update the completed attribute of the item:
In List.js, we add the data-attribute data-id to the checkbox element:
jQuery('<input />',{
    'id':'cb'+i,
    'data-type': 'dizmo-input',
    'data-id': list[i].id,   //<---
    'type':'checkbox'
}).appendTo(list_el);
and in Main.js, inside the click handler:
// checkbox
if (tid=="cb") {
    todo.Storage.toggleCompleted(eid);
}
Each click on the checkbox calls the toggleCompleted function of the Storage class, which we’ll now have to implement:
toggleCompleted: function(id) {
    for (var i = 0; i < this.storagelist.length; i++) {
    if (id==this.storagelist[i].id) {
        if (this.storagelist[i].completed) { this.storagelist[i].completed=false;
        } else {
        this.storagelist[i].completed=true;
        }
    }
}
dizmo.publicStorage.setProperty("dizmo-todos",this.storagelist);
},
This loops through all the items and updates the completed property and saves the updated list to publicStorage.
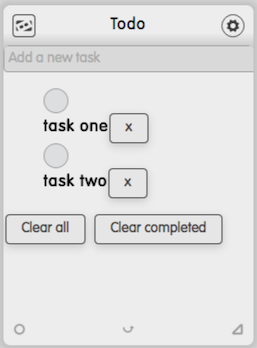
We can now add, remove and update todo items! Let’s add two buttons to clear all todo items and to clear all completed items. For that, we need to go back to index.html.
<div id="actions">
    <button id="clear-all" data-type="dizmo-button">Clear all</button>
    <button id="clear-completed" data-type="dizmo-button">Clear completed</button>
</div>
Since we also want to display a notification, confirming the delete action, we also add a notification element to index.html, right after the
<body> tag.
<div id="my-confirmation" data-type="dizmo-notification"></div>The two new button handlers take care of displaying the notification and calling the respective functions in the Storage class. Add the following functions to Main.js, inside the initEvents function:
jQuery('#clear-all').on('click', function() {
    DizmoElements('#my-confirmation').dnotify('ask', {
        title: 'Clear all todos',
        text: 'Are you sure? Please confirm.',
        ok: function() { todo.Storage.deleteAll();}
    });
});

jQuery('#clear-completed').on('click', function() {
    DizmoElements('#my-confirmation').dnotify('ask', {
        title: 'Clear completed todos',
        text: 'Are you sure? Please confirm.',
        ok: function() { todo.Storage.deleteCompleted(); }
    });
});
Now add the new functions to Storage.js:
deleteCompleted: function() {
    for (var i = 0; i < this.storagelist.length; i++) {
        if (this.storagelist[i].completed) {
            var removed=this.storagelist.splice(i,1);
        }
    }
    dizmo.publicStorage.setProperty("dizmo-todos",this.storagelist);
},
deleteAll: function() {
    this.storagelist=[];
    dizmo.publicStorage.setProperty("dizmo-todos",[]);
}
These functions are straightforward, deleteAll simply clears the array and saves it to the publicStorage, while the deleteCompleted function has to loop through all items and remove those who are marked completed.
What’s left is to update an existing todo item! Let’s implement that functionality now. A click to a label should replace it with an inputfield and allow to edit its content. After pressing enter, the item should be updated in storage and the inputfield switched back to a label. Phew, that’s some complex functionality!
In List.js, add another input element, which also contains the name of the todo item:
jQuery('<input />',{
'id':'ip'+i,
'data-type': 'dizmo-input',
'data-id': list[i].id,
'type':'text',
'value': list[i].name
}).appendTo(list_el);
This new input element needs to be initialized as well:
DizmoElements('#ip'+i).dinput;()But now, since we have a label and and an input element containing the same data, we need to show the label but hide the inputfield:
jQuery('#ip'+i).hide();
jQuery('#la'+i).show();
In Main.js, we need to expand our click handler. First, when a click is detected inside the list element, all input elements are hidden and all label elements made visible via a loop again.
// list
if (tid=="to") {
    // hide all input elements
    jQuery('.edit-todo').each(function(){jQuery(this).hide();});
    // show all label elements
    l=jQuery('.text-todo').length;
    for (i = 0; i < l; i++) {
        jQuery('#la'+i).show();
    }
}
If a click is detected on a label element, first hide all input elements that might be still open, and show all label elements. Then, hide the actually clicked label element, show the hidden input element and focus on it:
// label
if (tid=="la") {
    //  hide all input elements
    jQuery('.edit-todo').each(function(){jQuery(this).hide();});
    // show all label elements
    l=jQuery('.text-todo').length;
    for (i = 0; i < l; i++) {
        jQuery('#la'+i).show();
    }

    var cid=e.target.id;
    ioe=cid.substr(2,1);
    // show input, hide label
    jQuery('#'+e.target.id).hide();
    jQuery('#ip'+ioe).show();
    jQuery('#ip'+ioe).focus();
}
To handle keypresses inside an input element inside the list, we need to add keypress to the list event handler: jQuery('#todo-list').on('click keypress' ....
Now, every keypress is also passed on to our handler and we can add the functionality to handle updates to the input field:
// input
if (tid=="ip") {
    if (e.type=="keypress"&&e.which==13) {
        var nv=DizmoElements('#'+otid).val();
        todo.Storage.update(eid,nv);
        // hide input, show label
        ioe=otid.substr(2,1);
        jQuery('#'+otid).hide();
        jQuery('#la'+ioe).show();
    }
}
Each keypress is checked for enter, and if that is detected, the current value of the input element and its data-id attribute is passed to the Storage class to update. After that, the inputfield is hidden and the label made visible again.
That leaves us to update the todo item in Storage.js:
update: function(id,newValue) {
    for (var i = 0; i < this.storagelist.length; i++) {
        if (id==this.storagelist[i].id) {
            this.storagelist[i].name=newValue;
        }
    }
    dizmo.publicStorage.setProperty("dizmo-todos",this.storagelist);
},
Your Todo dizmo is built and functional but still unstyled.
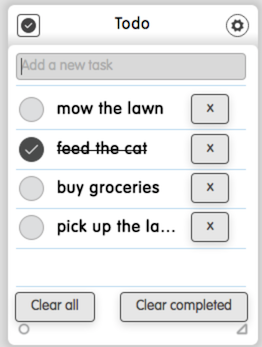
Functional Todo dizmo
Styling and usability
The Todo dizmo we have built is not very user friendly yet: When the list grows to necessitate a scrollbar, the user can just scroll it to see all todo items but not move the Todo dizmo itself. Add the class no-dizmo-drag in index.html to the tag <div id="todo-list" class="list no-dizmo-drag" data-type="dizmo-list">.
We also want to change the framecolor of the dizmo to white. In src/javascript/dizmo.js, add right at the end of the setAttributes() function:
dizmo.setAttribute('settings/usercontrols/allowresize', true);
// Set framecolor to white
dizmo.setAttribute('settings/framecolor', '#ffffffDB');//<--
Also, a checked todo item text should be marked with line-through. As List.js handles the state of the checkbox, add jQuery("#la"+i).css("text-decoration","line-through"); so the if (list[i].completed) statement is now:
if (list[i].completed) {
    DizmoElements('#cb'+i).prop('checked',true);
    jQuery("#la"+i).css("text-decoration","line-through");
}
Also edit the src/style/style.scss to add the necessary styling classes (make sure your remove the already present default classes. Finally replace the default icon (Icon.svg) of the dizmo in the assets Folder.
And that is how to build a Todo dizmo
Get the source code
You can find the source code on Github.
git clone git@github.com:dizmo/Todo.git